|
|
|
|
|
|
|
|
|
|
|
|
|
|
|
|
|
|
|
|
|
|
|
|
Support
 E-mail
© Copyright 2014
website2Go.com
All Rights Reserved
|

|

You are here: Help Topics > Edit Website > Edit an existing template, site or page > How to use Site Logo
Site Logo
Site Logo Use and Description
- The Site Logo is a smaller version of your company's logo that normally appears at the top of the Sidebar column on each page except the Home page.
- You can control the visibility of your Site Logo on a page-by-page basis (including the Home page) by toggling the Show/Hide element tool beneath it.
- Site Logos are automatically linked to the site's Home page. If a visitor clicks on the Site Logo, it acts as a button to go Home.
- Site Logos are limited to 100 pixels in width. The Editor will scale a larger image proportionally to fit, but a complex logo may be more effective if simplified and reduced to 100 pixels wide in your favorite image editing software before uploading.
Site Logo Buttons and Use

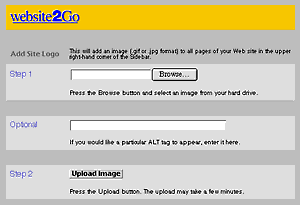
- When you click on the Replace Site Logo button, you will be presented with a web page containing several new features, see image below. If you are adding a Site Logo to a Build My Own site, the Add Site Logo button works exactly the same way.
- When you click on the "Browse" button, the web browser opens your computer's file management utility to allow you to chose an image from the contents of your local hard drive. Windows and Macintosh users will have slightly different system file management features associated with their machines.
- If you already know the path for the image file you wish to upload to the web site, you can type that path into the text field adjacent to the "Browse" button. If you don't know the path, use the "Browse" button.

- Once you have either typed in the image path in the text field next to "Step 1" or chosen the image from your file management system using the "Browse" button, you have one optional additional element you can add to the image.
- Important note about file names. Your image file name (e.g. the name you type in the Step 1 box) must NOT have any spaces in it. If the name has a space it will be uploaded correctly but will not be served correctly. Use underscore (_) or hyphen (-) to break phrases apart in file names like "this_has_spaces.gif" or "this-has-spaces.gif."
- The optional element is an invisible ALT tag which is place along with other web code associated with the image. The ALT tag will indicate to the browser what the image is if it takes a long time to download OR it will be read by reader software on the browser of someone who is vision impaired.
- ALT tags should be descriptive of the image they are used with. Thus, you might want to use the name of your company as ALT text.
- Finally, when you have filled all the fields necessary for this image, click the "Upload Image" button and the file from your hard drive will be sent to the web site and you will see it displayed in the editor window.
- You will still have to Preview or Publish your page to see how the results will look.
- Once you have added a Site Logo, it will appear in the website2Go Editor with a Replace Image button beneath. This button allows you to change the image, or, if you omitted filling the ALT and link sections, you can add them later using this feature.
- If you choose to delete the image, a special web page appears from the website2Go Editor which asks you if you're sure you want to delete the item. This is a safeguard against accidentally deleting something.


You are here: Help Topics > Edit Website > Edit an existing template, site or page > How to use Site Logo
|

|
 E-mail

