| ||
| ||
| ||
| ||
| ||
| ||
| ||
| ||
| ||
| ||
| ||
| ||
|
Support  E-mail
© Copyright 2014 website2Go.com All Rights Reserved |
| How to use Add File |
You are here: Help Topics > Edit Website > Edit an existing template, site or page > How to use Add File
Add File
File Use and Description
The Add File tool is an advanced feature that lets you upload files other than GIF or JPEG images. Examples might include multimedia files such as:
- sound files
- MIDI music files
- QuickTime movies
- Flash movies
- MP3 files
- Adobe Acrobat PDF documents
You may also use Add File to upload HTML files created outside of the website2Go Editor, whether written by hand or made with a standalone editor such as GoLive or Dreamweaver.
By default, the File element will appear on your website2Go page as a link. If the media type requires a different treatment, such as loading a plug-in via an <EMBED> tag, hide the File element and use Add HTML to write the necessary HTML code.
Files uploaded with Add File are put in the /files subdirectory. Thus, if you upload a custom HTML page and its associated images using Add File, your image tags should read:
<IMG SRC="/files/yourimage.jpg"...>
and links back to your website2Go pages should read:
<A HREF="/pXXX.html">
Due to the multitude of possible file types and our lack of control over their creation, customer support is limited to the mechanics of uploading such files.
Add File Button and Use
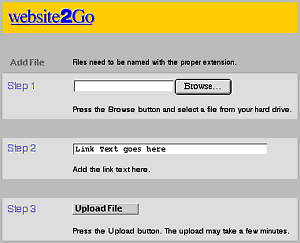
When you click on the Add File button, you will be presented with the File upload screen.
When you click on the "Browse" button, the web browser opens your computer's file management utility to allow you to chose an image from the contents of your local hard drive. This works just like the Add Image screen.

In Step 2, enter the text that you wish to appear on your page as a link. Even if you plan to hide this link, we recommend using some descriptive text as a reminder on your Editor screen.
Click the Upload File button to send the file from your hard drive to the server.
Important note about file names. Your file name (e.g. the name that appears in the Step 1 box) must use only letters, numbers, hyphens, underscores, and periods, must NOT have any spaces in it, and must not be over 40 characters long. If the name has a space it will be uploaded correctly but will not be served correctly. Use underscore (_) or hyphen (-) to break phrases apart in file names like "this_has_spaces.gif" or "this-has-spaces.gif."
You are here: Help Topics > Edit Website > Edit an existing template, site or page > How to use Add File
How to use
Element tools
Click this to kill the item.
Click on this to move an item further up on the page.
Click on this to move an item further down on the page.
Click on this to move the item to the top of the page.
Click on this to add space between the item and the one above it.
Click on this to remove space between the item and the one above it.
This is the text alignment tool. Click on the left button to align text to the left margin. Click on the right button to center the text.
The left side of the Show/Hide tool will show green if the element is visible. The right side will show red if the element is hidden. Click opposite to achieve opposite effect.