| ||
| ||
| ||
| ||
| ||
| ||
| ||
| ||
| ||
| ||
| ||
| ||
|
Support  E-mail
© Copyright 2014 website2Go.com All Rights Reserved |
| How to use Add Table |
You are here: Help Topics > Edit Website > Edit an existing template, site or page > How to use Add Table
Tables
Tables are used on web pages the same as they are in word processing documents: to present information in orderly rows and columns. One example might be a company telephone directory. Another might be a column of product images with descriptions and prices next to each item.
Using Add Table, you can insert a table anywhere in the Content or Sidebar columns, or in the Banner area at the top of the page. Each table cell may contain any of the normal page elements, in any combination. You can even insert a table within another table.
Add Table Button and Use
- Click the Add Table button to insert a table into your page. The table will appear in the column above the button you use.
- The Table Editor will open (see below).
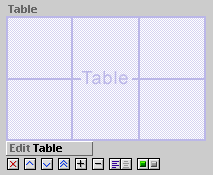
- When you return to the page, you will not see the table or its contents. Instead, you will see a Table proxy image, with the same controls as any other page element:

The Table Editor

- When you click Add Table, the Table Editor opens, with an empty table of two rows and two columns (four cells).
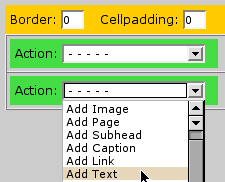
- Use the Table Editor to add page elements to table cells, to adjust the vertical alignment of elements within cells, and to set the border width and cellpadding of the table.
- When you use the Action menu, wait for the screen to refresh before using it again.
- The Table Editor does not display the actual width of columns. You may need to scroll horizontally to see some cells.

- In the yellow area, enter the width, in pixels, of the Border around the table and between cells. For no border, leave it at zero.
- Cellpadding is the amount of empty space around the contents of each cell, in pixels.
- Use the Action drop-down menu to add page elements to the cell.
- The Action menu also adds and deletes rows and columns from the table.
- Each action is taken as soon as a choice is made; there is no button to click. If you accidentally add an element by mistake, delete it in the usual manner, with its "X" control.

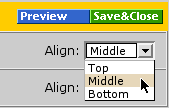
- Use the Align menu to set the vertical alignment of elements within each table cell. The default is Middle. Alignment is not displayed in the Table Editor, but will appear in Preview and on the published page.
- Use the Preview button to see how the table will appear on your page.
- The Save & Close button returns you to the website2Go Editor.
- Use the Edit Table button to reopen the table in the Table Editor.
Hints on using tables
- Use enough Cellpadding to separate the contents of one cell from the next for readability.
- Zero cellpadding is useful for assembling small images into larger ones, especially where one might be a link.
- In general, avoid using borders unless they help readability. Wide borders tend to be distracting.
- To add horizontal space between two columns, add a new column between them, and add a Text element containing a spacebar character. You can also add an image the same color as the page background (or transparent). Remember that your Cellpadding setting affects empty cells, too.
- To add space between rows, insert a new row.
- New columns are added to the right, and new rows are added below. However, the Action menu deletes the column or row, along with all its contents, in which the menu is used; once gone, there is no way to get it back.
- Elements may be moved vertically within cells the same as on a page in the Editor.
- Elements may not be moved horizontally or vertically from one cell to another.
- Make sure the page column is wide enough to hold the table and its contents. Use Preview to check your work.
- An image will force its cell wide enough to contain it. Don't upload images that are larger than you intend them to display. If necessary, resize images in Photoshop (or another image editor) before uploading.
- There's no limit to the number of columns you can add, but be mindful of how they affect the page. Use Preview to check.
- A little planning goes a long way! Don't hesitate to sketch your table on paper before you start. Calculate image widths in pixels, and consider the pixel widths of the column and the entire page.
You are here: Help Topics > Edit Website > Edit an existing template, site or page > How to use Add Table
How to use
Element tools
Click this to kill the item.
Click on this to move an item further up on the page.
Click on this to move an item further down on the page.
Click on this to move the item to the top of the page.
Click on this to add space between the item and the one above it.
Click on this to remove space between the item and the one above it.
This is the text alignment tool. Click on the left button to align text to the left margin. Click on the right button to center the text.
The left side of the Show/Hide tool will show green if the element is visible. The right side will show red if the element is hidden. Click opposite to achieve opposite effect.