| ||
| ||
| ||
| ||
| ||
| ||
| ||
| ||
| ||
| ||
| ||
| ||
|
Support  E-mail
© Copyright 2014 website2Go.com All Rights Reserved |
| How to use Add Image |
You are here: Help Topics > Edit Website > Edit an existing template, site or page > How to use Add Image
Images
Image Use and Description
- Images tell a different story than words. Use images when a picture will save words or when it will provide additional informaton above that which a text description will provide.
- Images must be one of two types of files. They can be Compuserve GIF file format or JPEG format. The suffixes for these two file types are ".gif" and ".jpg"
- Images which will go in the Navigation Bar or Sidebar area will be scaled down to a width of that column (the Sidebar default is 100 pixels). This means for your photograph to appear exactly on the web page as you created or scanned it, the original image cannot be wider than 100 pixels, or the width set in Site Defaults or at the top of the Editor screen. If it is wider, it will be scaled by some percentage horizontally to fit within the column width of the Navigation Bar or Sidebar. The vertical dimension will be scaled proportionately.
- Images intended for the Content area can be as wide as the Content column (the default width is 300 pixels). What this means is that images intended to grab the web visitor's attention should be used in the Content area unless they are highly recognizable when viewed at a narrower width.
Add Image Button and Use
- When you click on the Add Image button, you will be presented with a web page containing several new features, see image below. If you are editing an existing image, the Replace Image button works exactly the same way.
- When you click on the "Browse" button, the web browser opens your computer's file management utility to allow you to chose an image from the contents of your local hard drive. Windows and Macintosh users will have slightly different system file management features associated with their machines.
- If you already know the path for the image file you wish to upload to the web site, you can type that path into the text field adjacent to the "Browse" button. If you don't know the path, use the "Browse" button.
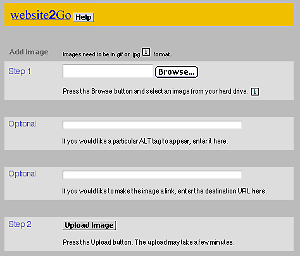
- Once you have either typed in the image path in the text field next to "Step 1" or chosen the image from your file management system using the "Browse" button, you have two optional additional elements you can add to the image.
- Important note about file names. Your image file name (e.g. the name you type in the Step 1 box) must use only letters, numbers, hyphens, underscores, and periods, must NOT have any spaces in it, and must not be over 40 characters long. If the name has a space it will be uploaded correctly but will not be served correctly. Use underscore (_) or hyphen (-) to break phrases apart in file names like "this_has_spaces.gif" or "this-has-spaces.gif."
- The first optional element is an invisible ALT tag which is place along with other web code associated with the image. The ALT tag will indicate to the browser what the image is if it takes a long time to download OR it will be read by reader software on the browser of someone who is vision impaired.
- ALT tags should be descriptive of the image they are used with. For instance, a photograph of a Stop sign would have an ALT tag which might read "image of a Stop sign," or "Stop sign picture."
- The second optional element is a link from the image to either another page on this web site or to another web site. The text field is used to type in the URL (Universal Resource Locator - web speak for the internet address, as in "http://www.website2go.com"). If you use this field, once the image is published on your web site, clicking on the image will take the browser to the linked page or site.
- Finally, when you have filled all the fields necessary for this image, click the "Upload Image" button and the file from your hard drive will be sent to the web site and you will see it displayed in the editor window.
- Once you have uploaded the image, you can use all the element controls to move it up or down the page and to create more or less space above it. Use the text alignment tool to center the image if it will look better centered in the area you are publishing to (either the Navigation Bar, the Content area, or the Sidebar).
- You will still have to Preview or Publish your page to see how the results will look.
- Once you have created an image, it will appear in the website2Go Editor with a Replace Image button beneath. This button allows you to change the image, or, if you omitted filling the ALT and link sections, you can add them later using this feature.
- When you chose to delete the image, a special web page appears from the website2Go Editor which asks you if you're sure you want to delete the item. This is a safeguard against accidentally deleting something.

You are here: Help Topics > Edit Website > Edit an existing template, site or page > How to use Add Image
How to use
Element tools
Click this to kill the item.
Click on this to move an item further up on the page.
Click on this to move an item further down on the page.
Click on this to move the item to the top of the page.
Click on this to add space between the item and the one above it.
Click on this to remove space between the item and the one above it.
This is the text alignment tool. Click on the left button to align text to the left margin. Click on the right button to center the text.
The left side of the Show/Hide tool will show green if the element is visible. The right side will show red if the element is hidden. Click opposite to achieve opposite effect.
Compuserve GIF file format
Compuserve GIF format was initially designed in the days of 256 colors and uses a blend of the 256 colors to achieve a similar appearance to the original. It can be a very small file size, particularly for simple items such as logos and icons.
JPEG file format
JPEG format was designed by photographers and photographic engineers to preserve color information at a variety of compression ratios. This allows a JPEG file to look more like the original but at the cost of a larger file size. Use JPEG for color illustrations which must remain faithful to the original - such as food illustrations or product photographs or pictures of people.
Importance of File Name
When you click on the Browse button to select the image file from your local hard drive, be certain that the filename associated with the image you want to upload Does Not have any spaces in it.
Macintosh users and Windows 95/98 users who select to use "long file names" have the option of using spaces. Don't.
The internet hypertext format and protocol do not allow links (and your image is a link in this context) to be properly read by the browser nor served correctly.
Use underscore (_) or hyphen (-) to create a break between words if the image file name is a phrase, such as "this_has_spaces.gif" or "this-has-spaces.jpg."
Image Editing Tutorial
Don't forget...
Don't forget you can use the "Preview" button to see how the image would appear on your page.