| ||
| ||
| ||
| ||
| ||
| ||
| ||
| ||
| ||
| ||
| ||
| ||
|
Support  E-mail
© Copyright 2014 website2Go.com All Rights Reserved |
| How to use Add Feedback |
You are here: Help Topics > Edit Website > Edit an existing template, site or page > How to use Add Feedback
Feedback Form
Feedback Form Use and Description
- The Feedback form allows you to create a reply method for visitors who wish to comment on something or other associated with your web page or site.
- The form which is created is of a type called a "mail reply form." This type of form gives users the opportunity to post a message to an email address of your choosing.
- Forms of this type are most useful on web pages where feedback is either solicited (How useful did you find the information?) or where the user could reasonably be expected to have additional questions (Please enter your question?).
- You can have more than one Feedback form on a page if there is reason to have more than one. Each form can have a different email address where the results are sent. Typically, though, Feedback forms would be sent to the site owner or an email address established by the site owner for purposes of receiving forms data (see also POP Email accounts, Email forwarding, Email Auto-responders in the Email help section under the main Help Topics menu or click these links).
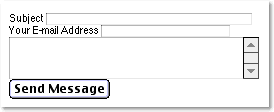
- When you create the Feedback form, it will appear on your web page and look similar to the image below. The email address is for the user to enter his or her return address in the event you have an auto-responder set up for this form.
- Clever ways to use Feedback forms and keep your users comfortable include setting up a specific email account which will receive form data (something like "formsdata@your.postoffice.com").
- You could also consider establishing an auto-responder for this specific email account which would send a message to the originator of the forms data. That message could be a simple "Thank you for your suggestion, we will be in touch with you shortly." Or, it could be a more sophisticated reply based on which form was filled out.
- By determining your customer feedback requirements early in your web site development, you can build in a very powerful set of customer response mechanisms.
Add Feedback Button and Use
- When you click on the Add Feedback button, you get an object in the Editor which looks like the image below. There are two parts. The square-like portion on top is what it will look like on your web page. The more rectangular portion below is where you type in the email address. The email address you enter will be the one receiving the contents of the form when the customer clicks on the Send Message button on your web page.

- Feedback forms have a specific width so you should consider them in much the way you consider photographs. They need to be "placed" on the page. But, like other element, they can be centered and more or less space as well as rules can be placed around them.
- Feedback forms can only be placed in the content area of the web page. This means that there cannot be any forms in the navigation bar area nor in the sidebar area. There are good reasons for this, many of which have to do with the ability of a browser to properly see and scale a form if it's placed outside the main content area.
- Like other elements, Feedback forms can be moved up and down and deleted.
- A particularly useful feature for Feedback forms which may not appear obvious is the Show/Hide control underneath the form. If you are using Feedback forms to enhance feedback during a certain phase or period, at the conclusion of that phase rather than kill the element, hide it.
- By hiding rather than killing the Feedback form, you can turn it back on at the beginning of the next phase and will have used a "hidden" feature of your web site.
- The email recipient section of the element is always editable, even during live use of the form on your web site. If the email address needs to be changed on the fly, the next person to use the Feedback form on your site after you have made the change will have their mail sent to the new location.
You are here: Help Topics > Edit Website > Edit an existing template, site or page > How to use Add Feedback
How to use
Element tools
Click this to kill the item.
Click on this to move an item further up on the page.
Click on this to move an item further down on the page.
Click on this to move the item to the top of the page.
Click on this to add space between the item and the one above it.
Click on this to remove space between the item and the one above it.
This is the text alignment tool. Click on the left button to align text to the left margin. Click on the right button to center the text.
The left side of the Show/Hide tool will show green if the element is visible. The right side will show red if the element is hidden. Click opposite to achieve opposite effect.