| ||
| ||
| ||
| ||
| ||
| ||
| ||
| ||
| ||
| ||
| ||
| ||
|
Support  E-mail
© Copyright 2014 website2Go.com All Rights Reserved |
| Create a new page or site |
You are here: Help Topics > Edit Website > Create a new page or site
Using the website2Go Editor
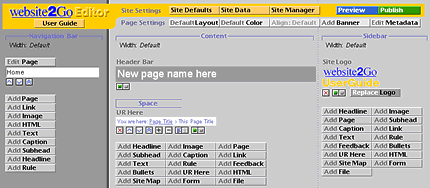
The Editor window allows you to create all the elements of a web page (and site) including the headlines, subheads, text fields, upload images and create pages and links.
The Editor works by adding new elements (which you create by clicking on a new element button at the bottom of the Editor window) to the bottom of your new page. If you want to move an element up or down, you use the element controls immediately below the element you wish to move. The double up-caret button moves the new element to the TOP of the page. The plus and minus buttons create more space or remove space between the element and the one above it.
What is the Editor window showing me?

With no elements on the page, the Editor window is showing only the creation and editing tools, no contents.
Clicking on any element creation button in the Navigation Bar, Content Area, or Sidebar will create a new element of the type you clicked on. Once you have a new element, you can manipulate it with the element tools located immediately below the element in the Editor window.
What should I do next in the Editor?
To create a text element click on the Add Text button. You can add text by typing in the text field. When you are done, you can choose to preview the changes by clicking on the blue Preview button in the top column of the Editor. You must click the green Publish Page button to commit your changes permanently. Clicking on the Preview button shows you how the page would appear, clicking on the Publish button actually makes the changes and returns with the page as it really appears. If you wish the text to appear as "centered" text, click on the right section of the text align button below the text field. To un-center and make flush left, click on the left-most section of that same button pair.
To add a picture element click on the Add Image button. Using the Browse button (which appears once you Add Image)select the image from your local computer (the Browse button allows you to navigate within your local computer's file system to find the correct new image). Click Upload Image to place the image on the website2Go server. You will then be returned to the Editor window and a small thumbnail copy of the image you just uploaded will appear on the page. Click on either the Preview button or the Publish Page button to either preview or commit the new image to being added to the page. Use the plus and minus buttons to change the spacing above the new picture once you have added it to the page.
To add a headline or subhead click on the appropriate button. Use the element tools to delete or change the spacing above or below the headline or subhead. Click in the the text field to type the actual text. Again, use the Preview button to see how the change will look or click the Publish Page button to commit your changes.
To add a link click on the Add Link button. Using the element tools, either delete, change spacing or move the link closer or further from the next element above it. You can embed URLs in text by using the appropriate HTML tags. This embedded URL, which points back to the home page of website2Go is an example of how you might use embedded URLs.
Move your elements around the page using the element tools (see Sidebar). Once you have all the headlines, subheads, text blocks and images you need, use Preview to see how the page looks. you can move the elements up and down the page using the tools located beneath each element. If something looks too crowded on the screen after you either Preview or Publish the page, use your back button (Publish) or click on the Edit Page button (Preview) to return to the Editor. Click on the + button on the element which needs the space above it to add space. If there is too much space between elements, click on the - button to remove space above that element.
When you are finished with creating and/or editing your page, click on the Publish button to commit your changes. Use the Site Manager Site Map button to look at the hierarchy of pages which constitute your site to make sure your sub-pages are in their proper order. If they are not, you will have to use the Editor to move the Page elements up or down.
You are here: Help Topics > Edit Website > Create a new page or site
What can be created?
The page has 3 major components, each component has elements. Not all components have all elements.
The left-most component is called the Navigation Bar.

The middle component is called the Content area.

The right-most component is called the Sidebar.

Element tools
allow you to create new elements. Elements can be manipulated by using the element controls which appear immediately below each element once it is created.
Click on an element tool button below to learn more about that element or about that element tool.