| ||
| ||
| ||
| ||
| ||
| ||
| ||
| ||
| ||
| ||
| ||
| ||
|
Support  E-mail
© Copyright 2014 website2Go.com All Rights Reserved |
| Full Reference Guide |
Your Tool Set
Site Manager
- When you enter the URL for your website Site Manager (YourDomain.com/SiteManager) you will be taken to a page which contains all the controls necessary for you to manage your website.
- The controls enable you to create web pages, email accounts, email distributions lists, and other aspects of email.
- The controls also give you access to website statistics and allow you to change the basic information about both your website and your account with website2Go.
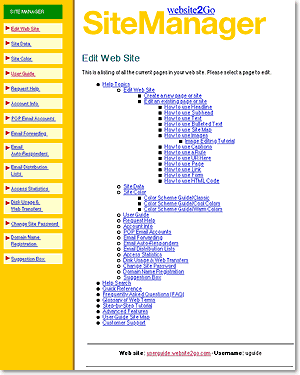
- The Site Manager controls take you to different web pages where specific features of that control's Site Manager functions are available.
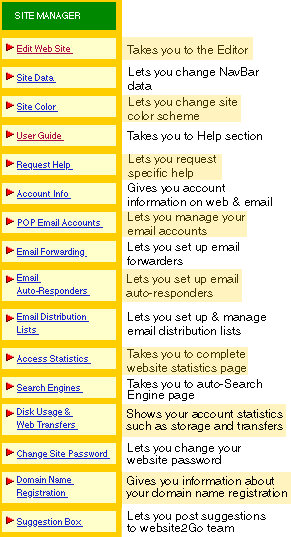
Site Manager Controls
The Site Manager controls look like this
How to get to the Editor
The Site Manager Content area shows a site map of the active pages for your website. Clicking on any page link will open that page in the Editor.
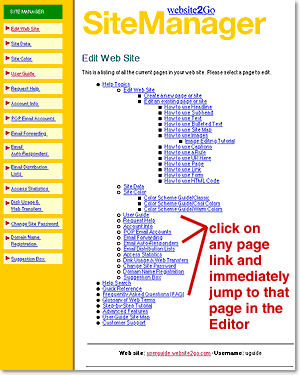
- The Site Map shows you all your website pages. The hierarchy shows relationships between parent and child pages.
- Clicking on any page in the Site Map (Content area of Site Manager) will open that page in the Editor.
Website2Go Web Page Editor
The website2Go Editor window looks like this
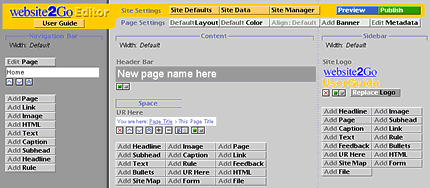
- The Editor has three areas - corresponding to the three areas of your web pages. They are:
- Navigation Bar - This area is always on the left of your web page and always contains the same items - hence it's name as "navigation" bar.
- Content Area - This area is always in the center of your web page and is intended for the main contents of that page - hence the name "content" area.
- SideBar - This area is always on the right-hand side and is intended for sidebar or associated material to that in the content area - hence the "sidebar" name for this section of the page.
- The Editor has eleven controls at the top of the window. They are:
- Preview - Clicking on this button will cause the changes you made using the Editor (adding text, images, etc.) to be cached on the server and fed back to your browser so that you can preview the results - hence the name "preview."
- Publish - Clicking on this button will cause the changes you made using the Editor (adding or changing text, etc.) to be permanently moved to the folder containing your web pages on the server - hence the name "publish."
- Site Manager - Clicking on this button will return you to the top-level page of the Site Manager (see above). You can return to the Editor by clicking on any page link within the content area.
- User Guide - Clicking on this button will take you to the website2Go User Guide, the fully annotated Help system for website2go.
- Seven more buttons control settings for the current page, and for the site as a whole. See the Editor Upgrade page for details.
Navigation Bar Controls
The Navigation Bar Controls look like this
- The Navigation Bar Editor has four controls. These controls allow you to create elements within the Navigation Bar area of your web site. They are:
- Add Page - Clicking on this button will create a new sub page with a link in the NavBar. After you have clicked on Add Page your page link will now have an Edit Page button below it.
- Clicking on Edit Page button allows you to jump directly to that page in the Editor.
- Add Link - Clicking on this button will create a new HTTP link in the Navigation Bar. Use this for an email address or a link to another web site.
- Edit Metadata - Clicking on this button will take you to the Meta data area of the Site Manager. This is where you edit the text which appears consistently on the Navigation Bar. It is also where you enter the keywords to describe your site for the search engines.
- Add Banner - Clicking on this button allows you to add a banner to the top of the Navigation Bar.
- Use the "X" to delete the element. You will be asked to confirm this delete action. If you change your mind, click the "Cancel" button. If you really want to delete the element click the "OK" button.
- Use the Up Caret to move the element higher up the NavBar. Every time you click on this button, the Editor window will refresh.
- Use the Down Caret to move the element lower down the NavBar.X Every time you click on this button, the Editor window will refresh.
- Use the Double-Up Caret to move the element to the top of the NavBar. Every time you click on this button, the Editor window will refresh.
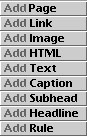
Content Area Controls
The Content Area Controls look like this
- The Content Area Editor has 13 controls. These controls allow you to create elements within the Content area of your web site. They are:
- Add Headline - Clicking on this button will create a new Headline in the Content area.
- Add Subhead - Clicking on this button will create a new Subhead in the Content area.
- Add Text - Clicking on this button creates a new text field in the Content area. The text will be black.
- Add Bullets - Clicking on this button creates a new bulleted text field in the Content area. The bullets and text will be black.
- Add Site Map - Clicking on this button creates a new website navigation map in Content area. The Site Map shows the hierarchy of your pages as an indented list.
- Add Image - Clicking on this button opens you to the Image upload page. The Image upload page Browse button will allow you to select an image from your local hard drive to upload to the server. You also enter information in this window to make the image a hot link.
- Add Caption - Clicking on this button creates a Caption in the Content area. Captions are in colored text.
- Add UR Here - Clicking on this button creates an automatic navitation link which allows users to go back, page by page, to the top level of your website.
- Add Form - Clicking on this button adds the Form Builder to your page's Editor screen. You can create custom response forms, and have the data emailed to the address you specify.
- Add Page - Clicking on this button will create a new sub-page with a link in the Content area. Like the Add Page button in the Navigation Bar, clicking Add Page in the Content area will add an Edit Page button beneath this element which allows you to jump directly to that page in the Editor.
- Add Link - Clicking on this button will create a new HTTP link in the Navigation Bar. Use this for an email address or a link to another web site.
- Add Form - Clicking on this button creates an email response form in the Content area. You fill in the email address to which the form contents will be sent.
- Add HTML - Clicking on this button allows you to use some advanced features such as double columns in the Content area.
- Add File - Clicking on this button allows you to upload a file of any type to be presented as a link on the page. Typically used for PDF, movie, or other media files.
- Use the "X" to delete the element. You will be asked to confirm this delete action. If you change your mind, click the "Cancel" button. If you really want to delete the element click the "OK" button.
- Use the Up Caret to move the element higher up. Every time you click on this button, the Editor window will refresh.
- Use the Down Caret to move the element lower down. Every time you click on this button, the Editor window will refresh.
- Use the Double-Up Caret to move the element to the top of the NavBar. Every time you click on this button, the Editor window will refresh.
- Use the + to give more space above the element. Every time you click on this button, the Editor window will refresh.
- Use the - button to remove space above the element. Every time you click on this button, the Editor window will refresh.
- Use the Text Align button to toggle between Flush Left and Centered text alignment. Every time you click on this button, the Editor window will refresh. The text is aligned left when the purple lines are in the left of this control's icon; the text is centered when the purple lines are in the right of this control's icon..
- Use the Show / Hide button to toggle between a visible element and an invisible element. Every time you click on this button, the Editor window will refresh. When the element is invisible (Hide) the button appears red; when the element is visible (Show) the button is green.
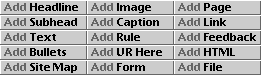
Sidebar Controls
The Sidebar logo
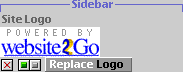
- One of the first things to consider is placing your corporate or company logo at the top of the Sidebar.
- The Replace Image button beneath the website2Go logo will allow you to replace the existing website2Go logo with one for your company.
- Important note: Your logo should not be wider than 100 pixels to fit properly into the Sidebar area.
- Clicking on the Show / Hide button you can simply hide the existing logo.
- Should you later decide to replace the logo, you can always click on the Replace Image button.
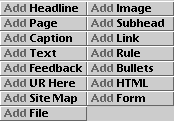
- The Sidebar Editor has eight controls. These controls allow you to create elements within the Sidebar area of your web site. They are:
- Add Image - Clicking on this button opens you to the Image upload page. The Image upload page Browse button will allow you to select an image from your local hard drive to upload to the server. You also enter information in this window to make the image a hot link.
- Add Subhead - Clicking on this button will create a new Subhead in the Content area.
- Add Link - Clicking on this button will create a new HTTP link in the Navigation Bar. Use this for an email address or a link to another web site.
- Add Rule - Clicking on this button creates a thin horizontal line called a rule. Use rules to separate images or different articles created in different text boxes.
- Add Page - Clicking on this button will create a new sub-page with a link in the Content area. Like the Add Page button in the Navigation Bar, clicking Add Page in the Content area will add an Edit Page button beneath this element which allows you to jump directly to that page in the Editor.
- Add Caption - Clicking on this button creates a Caption in the Content area. Captions are in colored text.
- Add Text - Clicking on this button a new text field in the Content area. The text will be black.
- Add HTML - Clicking on this button allows you to use some advanced features such as double columns in the Content area.
- Use the "X" to delete the element. You will be asked to confirm this delete action. If you change your mind, click the "Cancel" button. If you really want to delete the element click the "OK" button..
- Use the Up Caret to move the element higher up the SideBar. Every time you click on this button, the Editor window will refresh..
- Use the Down Caret to move the element lower down the SideBar.X Every time you click on this button, the Editor window will refresh..
- Use the Double-Up Caret to move the element to the top of the SideBar. Every time you click on this button, the Editor window will refresh.
- Use the + to give more space above the element. Every time you click on this button, the Editor window will refresh.
- Use the - button to remove space above the element. Every time you click on this button, the Editor window will refresh..
- Use the Text Align button to toggle between Flush Left and Centered text alignment. Every time you click on this button, the Editor window will refresh. The text is aligned left when the purple lines are in the left of this control's icon; the text is centered when the purple lines are in the right of this control's icon..
- Use the Show / Hide button to toggle between a visible element and an invisible element. Every time you click on this button, the Editor window will refresh. When the element is invisible (Hide) the button appears red; when the element is visible (Show) the button is green.
You are here: Full Reference Guide
Jump straight to UserGuide help for Site Manager buttons
Click on any of the Site Manager tool buttons below to jump directly to the full User Guide help section for that tool.
Jump straight to UserGuide help for Editor Controls
Click on any of the Editor tool buttons below to jump directly to the full User Guide help section for that tool.